2/07/2017

Analyze this...

As a diversion from the BITX40 kit, which does work (more to follow), I got my hands on the Ham Radio 360 Workbench group build project which is a simple Antenna VSWR Analyzer.

The design originally came from Beric Dunn, K6BEZ, and is centered around an AD9850 DDS module from eBay, supported by an Arduino Pro Micro and a bog-standard LCD display. Detailed info can be found on the Build Project Info page and in the builder forum.

The design is a simple SWR bridge using AA163 germanium diodes to read the forward and reflected power generated by the AD9850 board and the load under test. The Arduino ADCs read the sampled voltages across a sweep of frequencies and calculate the VSWR for the load. The user can select either the entire 1 - 30 MHz band for a sweep, or individual amateur bands, and is then presented with the frequency at which the SWR is lowest as well as the SWR reading itself.

Assembly was simple and quick. Thank God for kit designers who still make through-hole kits. Between my aging eyes and excessive coffee consumption, SMD kits are not a great idea for me. The folks at Rocket City 3D even designed and sold a 3D printed case for the project which not only looks great, but makes it less likely that I or the kids are going to static zap the project.

The final product is lightweight and easy to use. For a tool designed to locate the resonant point of a 50Ω antenna, this kit is great. For someone looking to map the performance of a load other than at 50Ω, this one isn't so hot out of the box.

Please, please, please don't misunderstand me: This kit is an excellent low cost tool, and more importantly, it's a great hacker platform, which you can see if you review the forums and see some of the adaptations. When trimming your dipoles to the right tune, this thing works great, right out of the box.

The difficulties I've experienced with the analyzer solely stem from my OCD engineer tendencies. These challenges are also part of why this kit is so much damned fun. 

Problem: To the left or right of a 50Ω load, the analyzer does not correctly calculate the VSWR and there seem to be some frequency-dependent measurement offsets that shouldn't, in theory, exist in this simple design. When a load other than 50Ω is tested, the analyzer consistently calculates the SWR too low; as much as 50% low in some cases.


Load (Ω)SWR
nominalmeasuredCalc.measuredError
10Ω10.1Ω4.95052.547248.55%
20Ω18.5Ω2.70271.603040.69%
39Ω38.3Ω1.30551.048519.69%
47Ω47Ω1.06381.01754.35%
50Ω49.5Ω1.01011.04083.04%
68Ω69Ω1.38001.063022.97%
100Ω98.5Ω1.97001.283434.85%
150Ω150.1Ω3.00201.727942.44%
200Ω197Ω3.94002.177844.73%

Where one would expect a 2:1 VSWR (100Ω), this instrument reports 1.729:1, and similarly up and down the range of resistive loads tested. Because this annoys me to no end, I'm trying to pin down some ability to automatically calibrate the instrument to make it behave better at other than 50Ω loads.

Idle Noise Compensation

The lowest hanging fruit, in my mind, is to make sure that the device is only measuring the energy from the AD9850 and not reacting to noise, either external or internal. In a system with no inputs, no voltages should be detected by the diodes or be sampled at the ADCs of the microcontroller. A simple routine can be inserted into the firmware of the analyzer that will very quickly read the detected voltages when no output is present from the AD950 DDS. The measured forward and reflected values in this routine can then be stored as an offset which can be subtracted from future measured FWD and REV voltages during a sweep of the antenna. 

int FWD, REV;
int fwdOffset = 0; // idle noise on the FWD diode/amp
int revOffset = 0; // idle noise on the REV diode/amp

    // Average the REV/FWD voltages when unexcited
   setDDSFreq(0); // zero freq will turn off the DDS output
   for (int k = 0; k < 50; k++) {
      revOffset += analogRead(A0);
      fwdOffset += analogRead(A1);
    }

    fwdOffset /= 50;
    revOffset /= 50;

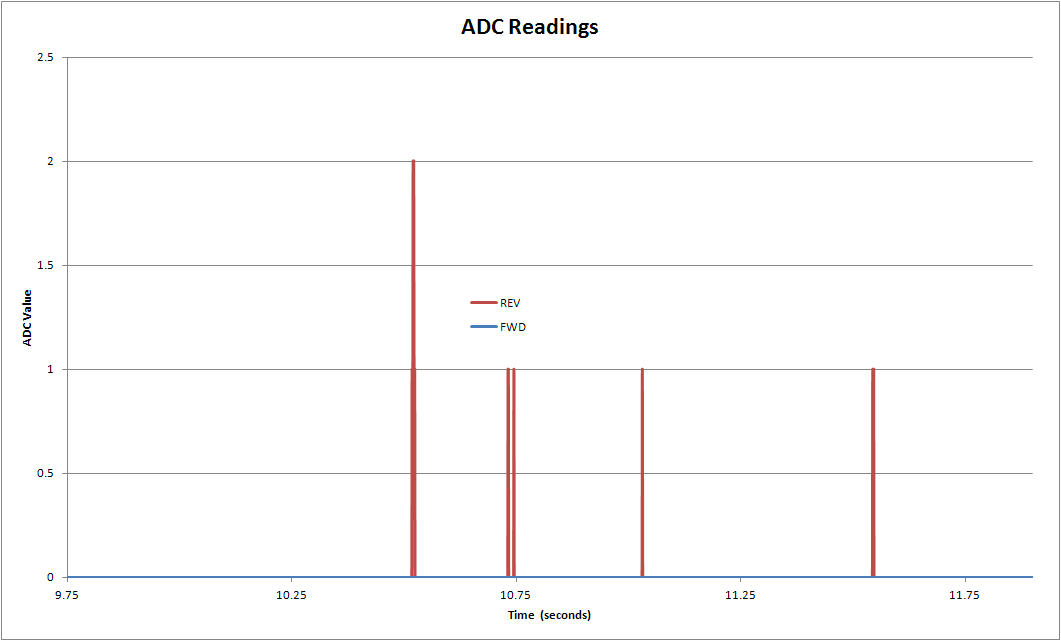
Here is what the idle noise looks like in terms of time on my system.

Uncompensated ADC values with zero DDS output
From the measurements, I took averages of FWD = 12 and REV=6 for compensation values to apply later. Having run this numerous times, I will tell you that these compensation factors vary across time and environment, therefore this sort of compensation scheme must be performed at scan time, not in advance and then baked into the code. Notice, too, the metronome-steady noise excursions particularly evident in the REV measurements. This shows as precisely 10.2 Hz repetition and is likely a local RFI source that I'll need to chase down later.

Having determined the compensation factors above, we can apply them in code such as...

      // compensation applied at measurement time.
      REV = (analogRead(A0) - revOffset);
      FWD = (analogRead(A1) - fwdOffset);

...with the result that we see the idle measurements change to the below chart. Note the change in scale for the vertical axis. Across 3,000 measurement cycles, FWD remained solidly at zero, and REV showed departures from zero only seventeen times, none more than about 8 mV of transient noise. This is a reasonable measurement expectation for a SWR bridge with no RF input.
Compensated ADC values with zero DDS output
This compensation method tightens up the measurements of 50Ω loads to less than 1% error from expected value. Unfortunately, it has no significant impact to the errors I describe above. At best, this method will enhance the instrument's sensitivity and precision, provided that the idle noise measurements and derived compensation offsets are executed immediately before an analyzer sweep.

So simple, so elegant, so automizable (a real word?), and so not any help for my problem. Next up, I'll look at compensating some mismatches in the amplifier gain and the detector diodes.

12/20/2016

Back at the homebrewing (sort of)...

After a lengthy absence, I'm starting to melt solder again, after a fashion.

There's been little work on actually cranking out a receiver or transmitter from first principles. Instead, I've been doing a lot of noodling on LTSpice as well as wiring up some baseband/audio circuits to experiment with different designs. For some reason, I've been avoiding any serious attempts at radio construction.

BITX40 ModuleEnter Ashar Farhan, VU2ESE, of BITX and Minima fame. On his newest site, HF Signals, he's made available a pre-built and tested 40 meter SSB transceiver "module" based on his classic BITX design from back in 2003. More amazing is the price: only $45, shipped. Perhaps some would say this is a cheat, a shortcut, but my thinking is that this is an opportunity to jump start my radio work. Who knows, maybe it will even motivate me to get off my butt and get my ticket. Time will tell.

The module comes along with a bag of the external parts; controls, wires, connectors, and such, leaving the final fitting and wiring up to the builder. I've put mine in a small aluminum case I found, drilled out for the fittings and controls. I really should get a center-punch as my drill press showed serious signs of wandering.

Since I'm without a license, I've omitted the PTT button for now and will be trying it as an SSB receiver. As of last night, I've got the antenna connector, volume pot, tuning pot, and speaker/headphone jack connected. Absent an actual +12VDC power supply, I'm using a 8 cell AA battery case to power the radio.

Now, the bummer: Applying power doesn't bring the radio to life. There is some hiss in the headphones, but there is no change in audio when connecting or removing the antenna. Nor is there any affect from the volume pot or the tuning pot. I've had no time to troubleshoot yet, with family and holidays here, but I'll be taking a look as soon as I can. With the symptoms I mentioned, no volume change or apparent VFO control, the first place I'm going to look is at the LM386 audio amp starting with buzzy finger check.

Wish me luck...


1/11/2015

On frequency!

Finally!

I put a 68 pF capacitor in series between the tuning capacitor, C12, and existing 68 pF capacitor, C10. That seems to have dragged the operating frequency sufficiently high to hear some signals. The oscillator circuit now looks like this:


Truth be told, to get up to the phone portion of 40 meters with this oscillator, I had to crank the T2 tuning slug ALL the way up, perhaps more than I really should, but it works. Currently, I'm covering 7,150.5 kHz up to 7,242.5 kHz according to my Si5351 signal generator (hooray for homebrew test equipment!).

I'm thinking I'll replace the two series 68 pF capacitors at some point with a single capacitor, perhaps in the 10 pF to 20 pF range to get the same coverage without putting the tuning slug up against the stops. There's also another reason to replace them: this receiver is drifty as hell right now. I couldn't figure out why it wouldn't stay on frequency, as I was seeing several tens of Hertz drift per minute. After a good bit of head scratching, I looked over my parts list and it turns out that all of the other oscillator caps are NP0 or COG, except for my 68 pF ones. D'oh!

The section on oscillators in "Experimental Methods in RF Design" needs some reviewing this evening. I'm not satisfied with the limited 92 kHz band spread that I'm getting out of this oscillator; it seems like I should be able to get more range of tuning. Without replacing it with an Si5351, I want to try and experiment with changes to the oscillator to get more spread, and I'll write up what I find.

Another area I'd like to experiment with is the "filter" between the mixer and the audio section. There's an awful lot of signals close together out there, and tuning or discerning one from the other is a pain. I ran a quick LTspice model on the components playing at being a filter, and it would seem that they do nothing of the sort. In fact it would seem that they actually attenuate audio below about 3 kHz. Not, I think, what I need for selectivity.

For anyone interested, I put together a short video of me sweeping the band. The audio isn't terribly great, and I think there was entirely too much interference, but I'm pleased to hear some QSOs out there today.


The first signals I heard were a round table of sorts on 7,185 kHz, with KK6TS, K6DNS, and W6NYW. Thanks to them for helping me, unknowingly, to validate my new receiver. I also got to spend some time listening to what I believe the participants called the "Do Nothing Net" on 7,222 kHz.

Let me know what you think...I really would appreciate the feedback.

1/10/2015

Oscillator thoughts

I'm still noodling around with the Neophyte, which is still oscillating terribly off frequency; about 1.2 MHz low from the 40 meter band target for this design.

Today, I tried to adjust the 42IF123 primary coil slug to see how "adjustable" the oscillator might be. It will adjust the oscillator output frequency but not by very much. Here are the results.

T2 slug maximum counter-clockwise (all the way "up"):
  • Top end: 6,801.2 kHz
  • Bottom end: 6,559.0 kHz
T2 slug maximum clockwise (all the way "down"):
  • Top end: 4,993.2 kHz
  • Bottom end: 4,822 kHz
A surprisingly large tuning range; about 2.0 MHz of tuning or about 1.8 MHz of shift, although the slug is entirely too coarse to be useful for tuning. As you can see, I still won't be able to get this on the 40 meter band as built.

That got me to thinking about the oscillator. I've poked around the components and construction layout; everything is as it should be. So one wonders: If the device is built properly, could the problem be in the design? Hubris, arrogance, pride, take your pick, but it's an honest question. 

As 40 meter direct conversion receiver, an ideal oscillator should percolate in that band and range across the entire band; 7,000 kHz to 7,300 kHz (I did say "ideal").  The original design from the QST article shows the standard Colpitt's oscillator layout (the amplifier transistor is internal to the NE602 chip and is omitted from my drawing).

WA3RNC's original Neophyte oscillator

Since a Colpitt's oscillator operator frequency is determined by a parallel LC tank circuit, bear with me while I render the complex WA3RNC tank circuit to its reduced form. Note that C12, a 4-365 pF air variable capacitor is set to a mid-range 180 pF for the purposes of this reduction. First, we'll reduce C10, C11, and C12:


Which is then added to the transformer's internal 47 pF capacitor. Simultaneously, I reduce C7, C8, and C9 on the right side of the transformer to yield the following:


Since capacitors in parallel are a simple sum, resulting in the equivalent parallel RC tank as:

Final equivalent tank circuit for WA3RNC's oscillator

Using the equation for parallel resonance, I get a resonant frequency of about 5,700 kHz. Strange, that's just about where my Neophyte operating frequency lies. Is it at all possible that the values for the oscillator NP0 capacitors from the QST magazine article is wrong? I have a spare 68 pF capacitor on the table, so if I add that in series between the C10 and C12, that raises the tank resonance to 7,360 kHz, which may be close enough for me to adjust the span using the transformer tuning slug so that I can cover 7,000 to 7,300 kHz.

Someone out there tell me if I'm flying too high for an unpressurized cabin, or if I'm on the right track, please! Comments?

1/09/2015

The Neophyte is working...

...for certain values of the word "working."

Over the last few days I've been hacking away at building and Arduino based signal generator using an Si5351 clock generator board from Adafuit. In another post I'll document that ordeal, but suffice to say that the signal generator is working!

Well, the very first thing I want to try is to test the Neophyte build with the output of the generator; haven't heard anything but AM broadcast breakthough so far.

So, I fire up the receiver and boot up the signal generator, and start tuning the generator starting at 7.000 MHz. Nothing, nada, bupkis, zilch. Neither a chirp nor a burp all the way to 8 MHz. How can this be? Now I'm no further along than I was before; I can't tell if the receiver is not receiving or if the signal generator is not generating. Oh, the frustration.

I'm a fan of Bill Meara's SolderSmoke podcast, and common refrain I've heard about troubleshooting is to take a step back and some time off. So, do I take his advice? Nah! I considered it, but where's the fun in that? But still, I'm at a loss as to how to proceed...no test gear, no other receivers, no clue.

I've been spending my commute time listening to older episodes of SolderSmoke; I think I'm back at about episode 60 right now, about when he was getting ready to depart London for Rome. One element of the podcast that was much more common in earlier episodes was "the bandsweep." Bingo! There is my next step.

My signal generator uses a rotary encoder to change the output frequency at the user's desire, so I could manually tune across the entire HF band to find a tone. Ugh, are you kidding me? I'd have to do it at 10 kHz steps in order to hear the chirp as I sweep around. For the arithmetically inclined, that's about 3,000 clicks of my 18 detent encoder, or almost 200 full rotations. Not really feeling the love for that task.

Instead of doing it with the hardware, I opted to beat it with software. The code for the generator was mangled to sweep the entire band and display the sweeping frequency on the LCD screen. When I hear a chirp, I narrow the sweep range. It took about four iterations of this to pinpoint my receiver's frequency. A little zero-beating and moving the Neophyte tuning capacitor, and I've got it.

Ladies and gentleman, I've managed to construct a not-quite-60M (52M or thereabouts) receiver using the plans and parts for a 40M receiver. I will now pause for a golf clap. The little bugger ranges from 5780 kHz to 5986.3 kHz, with a nice clear sound. Not much useful there, although according to NTIA the upper portion of this range is dedicated to broadcast radio so perhaps the "breakthrough" I was experiencing  was  actually bond fide radio signals. The range ~200 kHz is narrower than I expected, but that may be due to the oscillator working at a much lower frequency than I had planned.

Either way, I'm a lot happier than I was this morning: the signal generator works and the receiver works, albeit on a very wrong frequency than I built for. Now, just what the hell did I get wrong in the oscillator circuitry? Time will tell...

1/08/2015

Derp!

I was doing some account cleanup on G+ and managed to make private the repository holding all the images for this blog. Hence the weird "place holder" images that looked like a giant minus sign enclosed in a circle. Sorry for derpiness, all should be fixed now.

1/02/2015

Just 'cause it looks pretty...

...and it does look pretty, it just still isn't working.

I was thinking on my problem from last evening on the commute home this evening, particularly the symptom wherein the peaking capacitor on the RF input tuned circuit seemed to have no effect on the received signal. What I hadn't mentioned in the last post was that the tuning slug in the 10.7 MHz IF transformer did change the received signal, albeit not enough to copy any useful signal.

What, I thought, would be the effect if I had soldered the leads for the peaking capacitor to the wrong transformer leads? The front end is balanced feed into the NE602 inputs on pin 1 and pin 2, but oddly enough the peaking capacitor which supplements the transformer's internal 47 pF capacitor is specified to be from the mixer pin 1 to ground (vice across the balanced inputs). One could assume that putting the variable capacitor from pin 2 to ground would work as well, no? It turns out, not so much.

It may be difficult to make out in the photograph, but the green/black pair of leads, which run from the peaking capacitor, runs to the transformer pad on the lower right of the can, which is then connected (by the green jumper) to the NE602 pin 2 RF input B. A few short minutes to heat up the soldering iron, and it's now on pin 1, RF input A, as the design called for in the first place.

Now that that is properly placed, the front end has positive tuning ability via the peaking capacitor, and I now understand the purpose of the potentiometer on the primary side of the input transformer...the audio output of the receiver is now quite loud, louder than I would like to have jacked into my headphones for any significant length of time. The potentiometer was omitted during construction to simplify my prototyping and to have one less thing dangling from leads off the board (currently I have the big tuning cap, the peaking cap, the headphone jacks, the antenna/ground leads, and the battery pack). After I pack the munchkins off to bed later tonight, that potentiometer will be soldered into place.

This still hasn't fixed the problem of receiving useful signals here, but that may have been due to me having the antenna wadded up under the workbench in the garage with fluorescent lights running overhead. I'll take it out to the patio later for some real testing with a real-ish antenna.

Incidentally, does anyone know how many turns the 42IF123 tuning slug is capable or moving?

I Hear Voices...

No, not like that.

I finished the basic construction of the Neophyte this evening. No mounting or case yet, just the basic board in a cardboard box with the tuning and peaking capacitors dangling from twisted wire.

There's a good bit of background noise and as I tune, there is a lot of non-signal audio that shows up, but I can definitely hear some radio signals. I'm relatively sure that at least one of the signals is some AM broadcast blow-through; there's some serious fire-and-brimstone stuff on that channel. None of the other signals have been strong enough or clear enough to pick out actual intelligible conversations or, better yet, call signs, but it's a start.

Strange thing: The peaking capacitor on the tunable front end has zero impact. Have to check to make sure that I have it wired up correctly and that I haven't somehow killed the capacitor.

Also need to get a better quality antenna rigged. I found two bits of 30 foot long bare wire (actually gardening wire one would use to tie back plants to a trellis) and am using them as a bare ground and end fed wire antenna. I think I'll wander down to the hardware store and pick up a roll of something small gauge. There's a small pass through in the wall next to my desk, so I think I'll run the wire out that and down a line of palms that line the driveway; perhaps about 100' of wire would work. Through the same hole, I'll drop more wire down to the utilities connection point directly below where I sit.


12/29/2014

Off The Breadboard - Audio Stage

Now that I've managed to get the LCD and rotary encoder working with the Arduino, it was time to take a break from the signal generator project for a bit. The Si5351 board still needs to be connected and code tested and I realized that I need to craft up some sort of menu system to control the frequency and drive level of the Si5351 outputs. After a bit of Finite State Machine thought experiments, my digital brain is saturated and needs to be brought back to earth with a little solder smoke and analog work.

Where the Neophyte had been left off was with a breadboard prototype which in some fashions functioned; the oscillator was percolating (I think), the tuning capacitor provided some level of variability in the oscillator output (I think), and the front end was can be tuned (this I know). There is yet a distressing lack of ability to actually tune an intelligible signal, but in the absence of anything more than my cheap DVM, I realize that I'm at the limit of my testing ability beyond what I described in my last Neophyte post.

Since I was at an impasse here, and I noted an exceptional amount of "hand capacitance," I decided to rip the prototype out of the breadboard and assemble it Manhattan-style on single sided copper boards. Soldering well is a bit more difficult than I remember, but then again I come from the illustrious school of "the bigger the glob, the better the job" solder training. I never had the manual dexterity to get in to the Navy's 2M (Micro-miniature) repair soldering courses of instruction. What really helped here was the Manhattan accessories offered by Rex Harper (W1REX) at his storefront www.qrpme.com. I used his MePads to mount the DIP sockets for the LM386 and SA612 chips...saved me several toasted chips, I'm sure. The MeSquares were equally awsome for rapid building.

What we have so far is the audio stage centered around the LM386 amplifier chip, along with the low pass filter coupling the down-converted audio from the SA612 mixer chip. The "dancing capacitors and resistors" in the corner of the board are the Zobel network and output coupling capacitor which filter and feed the amplified audio signal (if I ever find one) to the headphones of the receiver.

Don't ask me why I did it that way; I think it was a gut aesthetic call that struck me in the cloud of solder smoke. From a technical perspective, shorter leads tend to be better to reduce unwanted coupling and other feedback problems, but as these components are themselves filters I judged the technical risk to be low. Now, if I have to eat a little crow on that estimate, you can see I've backed myself into a corner (pun absolutely intended) since there is no copper left to which I can move the dancing components. If that is the case, I'll end up moving the two capacitors and the resistor to the headphone jack itself where it will be mounted on the front panel.

If you are not familiar with Manhattan construction, I highly recommend it to anyone interested in electronic construction. Back in the Navy days, I did some custom electronic construction of some data collection systems and had a horrible time with PCB design and etching; the chemicals are awful and my success rate was abysmal.

Manhattan style allows one to build up the circuits in a very logical, easy to design manner in which everything is visible and available to the eyes and fingers. For your further reading, I'd recommend Chuck Adams' (K7QO) two articles on the basic and advanced techniques (both links are PDFs):


Now, I've not applied power and done rough testing on this yet, but visual inspection and ohmmeter testing show no gaps or solder bridges. Tonight I'll try to get some of the mixer, oscillator, and/or front end installed.

12/23/2014

Signal Generator Part 2b - Interrupting Oneself

Now that I've finally bulled my way into successfully reading the encoder status, I can move on to the final part of my rotary encoder experimentation.

The motivation for this final part of playing with the encoder comes from the blog post "Continual Interruptions" from Paul (M0XPD). He points out the problem of missing changes in the encoder status if the polling of the encoder is in the main loop() code. When the encoder status is read using the process() function and it is the only code in the loop, there is literally no chance of missing any status changes as the encoder shaft is rotated. Essentially the "sampling window," as Paul terms it, is 100% of the Arduino processing time.

As the loop is filled with other bits and pieces of code, the percentage of processor time available to read and process the encoder status begins to shrink. If the window becomes small enough the code will begin to miss encoder status changes, resulting in sluggish response to user input, incorrect direction decoding, or "stuttering" of output events as buffered changes flood the code. The actual impact is highly dependent on what functions/libraries are used to read and process the encoder status. In this signal generator implementation using the SQ9NJE Rotary library, we would only suffer sluggishness or occasional incorrect direction events. Note that the problem becomes significantly worse as we stuff the "loop" code full of delay(milliseconds) calls as we often do.

The "polling" method of reading the encoder is kind of like us asking the processor "has the encoder been rotated" with the risk that if we wait too long to ask, we'll miss a change. A better approach, and the one that Paul describes, is to let the processor tell us "hey, buddy, the encoder rotated, what do want me to do now?" This is the "interrupt" method of input processing and as a bonus, it's generic to any pin input code we might envision.

It's highly unlikely that the final signal generator product will have such processor intensive code or be so full of delay(milliseconds)that it will suffer the symptoms described above. That said, and because I very much enjoy the challenge, I chose to handle the reading of the encoder in an interrupt routine.

Handling pin changes on an interrupt basis seems a fairly straightforward concept in ArduinoLand: Tell the chip that it needs to handle an interrupt, tell it what to listen for, and tell it how to respond when the interrupt fires.

What appears to be the most common implementation, as used in M0XPD's Si5351 code, is to enable the pin change interrupt for one of the pins connected to the encoder (only one pin needs to be "listened to"), then write an Interrupt Service Routine (ISR) which is used to handle the arriving data from the encoder. Here's a clip of how he implements this.

Notice the "bit-fiddling" going on in lines 3 and 4. These are bit masking manipulations that one uses to ensure that the Arduino is paying attention to the correct pins and ports for the interrupt we are creating. The friendly names you see here are SPECIFIC to the processor AND the hardware pins used by the designer. So this explain why the code wouldn't even compile for me using a Micro, as I'm quite sure that M0XPD is using an Uno or other non-Leondardo based Arduino.

No amount of purposeful (or random) bit fiddling and deep reading on the variables used in the masking routines could avail my problem. Sidenote: The documentation on this subject is miserable, both at Arduino.cc and elsewhere.

Thankfully, there is more than one way to do interrupts. The other, easier, but more limited approach is to use external interrupts. This method avoids the need to mangle bit-masking to listen correctly; rather, in the "setup()"code we make a single call to attachInterrupt(pin, ISR, mode) and create an ISR function of any name. The first two of three arugments are an integer pin number (or friendly name) and the name of the ISR function (notice the lack of parentheses on the name). The last argument is the interrupt mode, or at what point in a pin change event will the interrupt handler fire. There are several choices for mode, but what makes the most sense for this project was to trigger on CHANGE. Line 40 in the code below shows how I implemented this, along with the rest of the signal generator code so far. The final ISR implementation is on lines 29-35; note that the function name is no longer ISR() and matches the handler called out in the attachInterrupt() function.

I still need to do some more experimentation on the Pin Change Interrupt approach. Even though the system is doing what I want, I'm not fond of not reaching my objective.

Next up, getting the actual Si5351 Clock Generator on board the prototype.